Category Archives: Project 3: Live Brief
Project 3: Live Brief: Final Animation
Project 3: Live Brief: Scenes I Animated
Project 3: Live Brief: Evaluation
(still needs to be proof read)
This project has proven itself challenging for everyone individually but together I feel we have strengthened and widened one another skills and abilities. We started this project very well, discussing ideas, what animation techniques would be most effective as a team, and who would be able to handle each roll best and how one another could benefit each other in those rolls. So we decided on After effects because that would be an animation software we could all use, some better than others but that’s why we researched and helped one another by teaching each other what we had learnt i.e. after learning how to rig characters I was able to give Anthony the spliced up assets to a character I had made and show him how to rig the character. Although he was only able to rig the one character, this did save me time and allowed me to focus on the others. This also helped him understand the rigs so that he could animate more effectively. I also made notes as I learnt which made sharing information amongst the group quicker i.e. hotkeys/shortcuts for executing actions and what dimensions we’re using for scenes and characters. Generally we kept most information verbal though, asking each other constantly on what improvements could be made to either the script, scenery or characters. Multiple changes were made, some even mid process but they were necessary to achieve our clients expectations. For example our clients wanted the script changed to include more information which in turn lead to new character to be implemented (the nurse in red scrubs). Multiple changes were made to our background and without a doubt I don’t regret asking Kia to redo the backgrounds. Her outcome the second time round was drastically better after getting to understand illustrator. We also made changes to many scenes and transitions after the script change but we managed to pull our heads together and come up with a suitable outcome. To handle those easier Anthony took the liberty of learning premier pro a bit more and editing the scenes already completed, whilst Kia took over one of his scenes.
So a over-cap, I handled the art direction (Character design, Colour schemes, Storyboarding, Creating and rigging the characters, and Animating), Anthony covered more of the written side (Scripting, exchanging information with the Client, documenting progress, Audio and editing), and Kia also helped oversee some of the art aspects (Recreating the background in Illustrator, Animating, Voice recording, and Drafting the initial script). These were our general rolls but we were all able to help or contribute constructive criticism amongst one another.
In terms of timing, initially we started very strong. There were a few hiccups i.e. we had everything need for the presentation except a finished storyboard. Fortunately they weren’t too bothered, liked our idea as well as designs and organised another meeting with them and the children soon after. We were able to produce the storyboard along with a simple animatic to present in time and it went very well although they did ask us to add more specific information which lead us to adding another character and more to the script. Afterwards our pace did slow down slightly due to the animation process waiting on me to recreate all of the characters spliced up and rigging them but this did allow the others to brush over everything. Making sure the script was nicely put together, the background assets were all completed without size complications(which was an issue that was fixed in that time), and to have the audio put together enough to animate off of. Our final production shamefully wasn’t fully produced at it’s best by the uni deadline due to some scenes causing issues and taking longer to animate than anticipated. Although our clients are okay receiving the animation whenever and are happy for us to take longer to perfect it, I am annoyed at myself for not giving myself and the team longer to make the changes we made. I didn’t anticipate the issues occurring with the rig and how long it would take to fix them (some rigs didn’t work well with just three pins in each limb, some limbs were needed to produced as separate PNG’s so that they layered behind certain objects, and most of the limbs didn’t work being layered behind the body, etc.). Nor did I acknowledge how long it would take to animate a walk cycle in my final scene. We did produce an animation on time but not a fully complete version.
If I could go back now I would love to reassemble the rigs and the spliced layers for them. It would cut down on animation time tenfold and allow smoother actions without distorting limbs too much/at all. Going into a project next time involving after effects now, would be much easier knowing what works and how it works. No more composition size issues, character issues, and animating issues. I would though like to learn more on how to create characters and assets easily and quickly in After Effects straight away, instead of having issues with size and file management/transfer with photoshop. I would also have liked to produce my designs and storyboarding quicker so that in the future I have more to present and receive feedback earlier on in the process. In order to achieve that I think I should draw more often in pen to increase consistency, as rough as possible to produce more but with a larger range, or within a time limit to increase speed. Maybe I should even start trying to create my characters straight off in the software we’re using to animate. Speeding the design process and giving room for testing the animations assets, I think will allow a more consistent work flow amongst colleagues and with the software in general further down the line.
Project 3: Live Brief: Presentation


Project 3: Live Brief: Concept Art, Storyboard, final designs and final storyboard
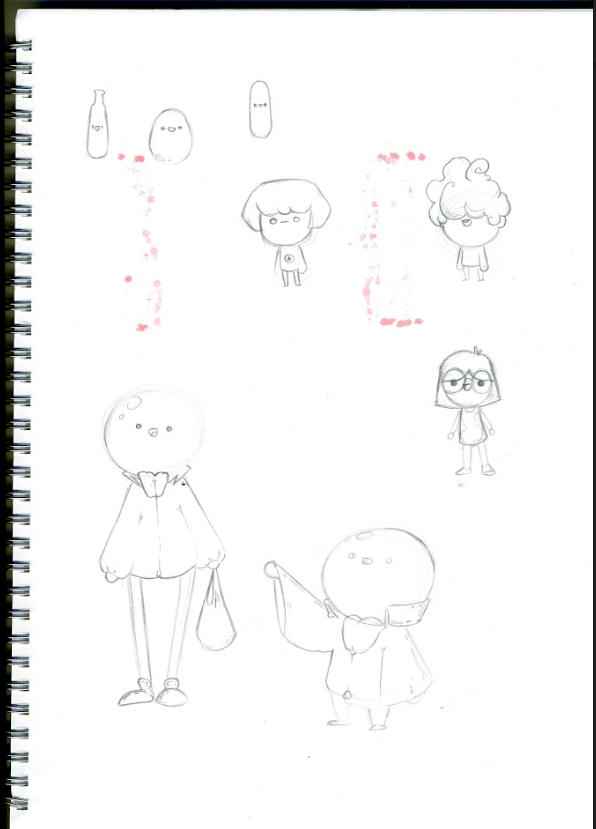


The storyboard was built on a rough script developed by Anthony. He also produced a very rough storyboard where we discussed the transitions. I then took what we discussed and composed them into a storyboard.

Shots:
- Establishing shot *transition: Jump Cut, L Cut*
- Close Up covering half of the screen using a Wipe to reveal the Dr’s close up *transition: Jump Cut, J Cut*
- Medium Shot *transition: Zoom Out/Pan to the left slightly to keep the characters compositions in the centre of the frame, L Cut*
- Full shot
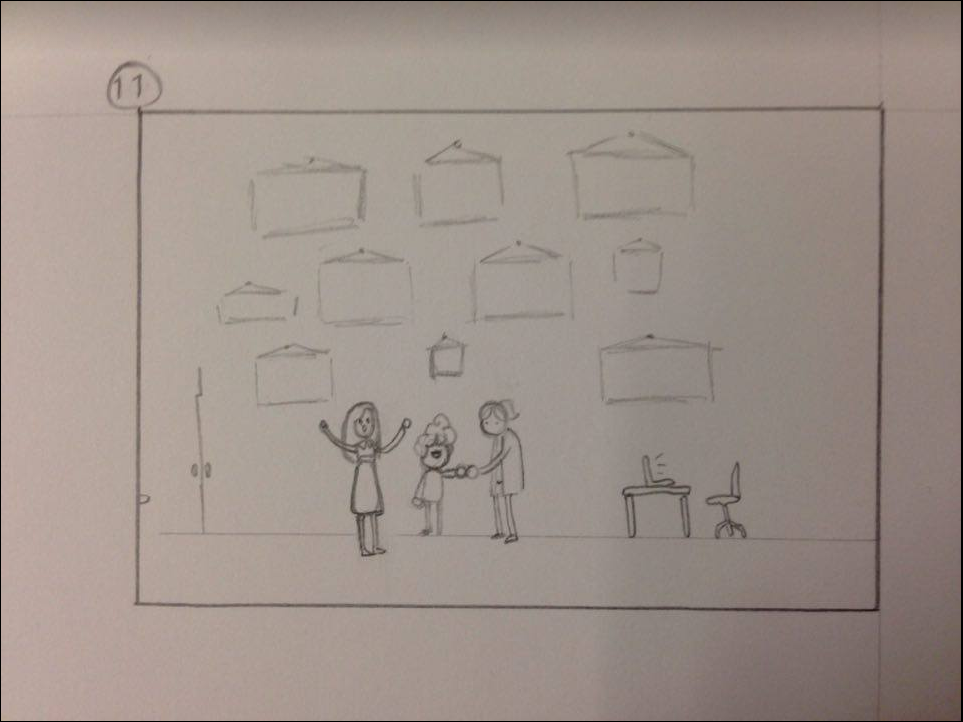
“
int. doctor’s office – day
The scenes opens on a PARENT, the accompanying CHILD, and a DOCTOR all standing within a reception room. Across the back of the wall several empty picture frames sit in two lines. A mature, but younger sounding voice speaks in the Voice Over (V.O).
(V.O)
At the Sir Peter Mansfield Imaging Centre they want the scan to be a quick, safe procedure that can be done and sorted within the single day.
Throughout we see the Doctor writing on a pad, talking with Parent and Child as they nod and agree in return.
V.O (cont.)
If this is your first time there is no need to be worried; the doctor will go through the entire process from beginning to end, and any important documents that need to be signed, will be signed along with both you and your parent/guardian’s signature agreeing to consent.
“

- Same Full shot but panned to the right *transition: Jump Cut / Zoom In, L Cut*
- Close up (hand stretches off screen and then back on) *transition: The hand rotates*
- Close up *transition: Zoom In*
“
V.O (cont.)
Let’s take a look at the miniature capsules you will have to swallow:
The Doctor turns and reaches her hand towards the desk behind her, the camera zooming in with her movements onto what she is taking.
You will be swallowing sets of 24 each over the next three days…
“

- Close Up of the hand *transition: Zoom in, L Cut*
- Long Shot of the capsules in the casing *transition: Zoom in/ Dissolve, J Cut*
- Medium Shot of the capsules bobbing *transition: Tracking shot of the capsules falling, J Cut*
“
The camera begins zooming in towards the hand. As it closes, the Doctor’s hand swipes away the lid of the container revealing a handful of small capsules sat within. Going even further until a small number of capsules are dominating the view–they bob up and down, happy, smiling faces on each.
As each bob up and down small dimension appear around them reading: 8mm in height, 4mm in width.
V.O
They are tiny; smaller than a tictac, and contain all the needed things to help your doctor see what they need to see.
“

- Medium Shot of capsules falling *transition: Dolly Out*
- Long Shot of the capsules sitting the three different coloured liquids all layered in the order they’re announced *transition: none*
- Long shot, liquids swish back and forth *transition: none*
The handful of capsules begin to drop, landing a second later in yogurt.
V.O (CONT.)
They can be taken with anything that can make it easier for you…
Yogurt..
The recognisable shape of a yogurt pot materialises along the top, encased in a green circle.
Water…
A glass of water appears next to the yogurt and the yogurt with the capsules also changes.
Or anything else like juice…
A glass of juice joins the water and yogurt, and the fluids once again change.

- Long Shot the capsules come to a halt *transition: none*
- Long Shot of the capsules starting to fall *transition: the camera tracks the capsules falling*
- Long Shot of capsules falling *transition: the camera tracks the capsules falling while the walls of the throat move into the shot*
- Long Shot of the capsules falling down the throat *transition: the background goes out of focus and dissolves into the colours of the scrubs, J Cut*
“
The capsules once again begin to fall–the throat of the child coming up to consume them as they enter the esophagus, which is dominating the background.
V.O
You are not expected to swallow in the whole group of 24 at once; you can take one at a time, or in groups that are more manageable.
Once taken, we begin to prepare…
“

- Long Shot of the capsules frozen in place *transition: Zoom Out*
- Medium Shot of the child in scrubs *transition: Jump Cut*
- Long Shot of the child standing in the waiting room *transition: Long Take, Tracking, Dolly to the right into the next room*
“
The capsules slowly materialise into a pattern on fabric.
..it takes up to 4 hours for the mini-capsules to reach an acceptable level within your system and once ready you will be getting dressed into the proper clothing of metal free scrubs or pyjamas.
The camera pans out to reveal the Child now in multi-patterned scrubs once again with the Doctor and Parent, a closed door sits to the right of the room.
“

“
Absolutely nothing metal can be within when the scan is working. This includes…
Like with the fluid examples iconic pictures for each new example form across the top.
Accessories…
A handful of rings and jewellery appear with a red bar going over: like how in a no smoking sign.
Change…
One pennies and two pennies form, another bar cutting through.
And mobile phones…
A mobile phone, headphones plugged in follow.
The Doctor gestures through the door and the camera follows, the MRI machine sitting to the right, the Child within it (we decided that the Dr would tell the patient once inside the room). The Doctor then walks through the door and enters the room with the MRI.
V.O
When you are in the MRI, we’ll begin: the mini-capsules help us to track within your digestive system, and learn what we can.
The Doctor looks at her pad and nods in agreement as she examines the MRI.
“

“
This itself is probably the quickest part–
The camera begins zooming in on the MRI, it materialising into a clock with just the big hand–set on 0.
–in just 10 to 15 minutes the scan is complete.
(the hand ticks down quickly to the 15 minutes mark)
And once complete–you can go.
The clock materialises into the hand of the Doctor.
“

“
The Child’s hand clasps the Doctors, and they begin to shake hands as the camera pulls out. They are revealed to be back in the office at the beginning. Each aforementioned picture frame in the background contains the main points of what was explained, their animations playing out within the constraints of the frame.
“

“
V.O
From here on out, you can be ready to go home. Anything you may need to take home with you will be given by the Doctor for you to complete or take in your own time.
The shot closes with everything materialising into credits referencing the people and necessary companies/organisations involved.
“


Project 3: Live Brief: MRI Research
Our Client kindly gave us a few documents to read over and leaflets so we went through them and highlighted the key points they wanted
Structure:
Highlighted what is important from the fact sheet they gave us. Colour has been used to define important parts.
Consent
Swollow
Scan
- Visit #1 – Preparation
-
-
- With parent/guardian, the child will sign consent forms at Sir Peter Mansfield Imaging Centre at the University of Nottingham. Going through paperwork like “Safety Screening” for the MRI and then “Questionnaires”.
- Will be asked what the child prefers to take their mini-capsules with (fruit juice, water, yoghurts), which will then be ready for them when they start take the first set.
- Then decide on dates for visits that will not clash with the child or parent/guardians activities.
-
- Visit #2 – First Scan
-
-
- They start the day by swallowing the first 24 mini-capsules with whatever the child wanted to consume it with; this is not necessary to be done at once–can be done one by one or in groups, etcetera.
- 4 hours pass for the mini-capsules to reach some distance into the body before the first MRI scan–in this time the child can do whatever: play games, watch a film, and so on and so on. The place also provides free internet.
- Pre-MRI scan:
- The Scanner Operator [what’s the official name?] comes to discuss with the child on particular things as well as to make sure to remove all things metal and that can interfere with the scanner. Another safety questionnaire will also be done. After, the child changes into metal-free scrubs.
- The First scan:
- The child is put into the machine.
- The scan itself takes 15 minutes.
- The child is then given the rest of the mini-capsules to be consumed over the next 2 days in sets of 24.
-
- Visit #3 – Second Scan
-
-
- 4th day after the first scan is the next session: it will only be 1 hour long–get changed, have the scan, be gone.
- If there is no trace of the mini-capsule left in your system you are free to go until after the treatment.
- If there are still traces the child is asked to return 3 days later for 1 more scan.
-
- Visit #4 – Pre-treatment Visit
-
-
- The child comes in for another hour session [email asking what exactly?].
- This is Part 1 of the study finished.
-
- Visit #5 – Post-treatment Visit
-
-
- The child can choose to do Part 2, if they say yes then some new consent forms need to be signed and the next 3 visits are laid out–though this time all 3 sets of 24 mini-capsules are given to be taken at home, though consuming them must be done under supervision by the parent/guardian and on days set out with the doctor.
-
- Visit #6 – New Scan
-
-
- This is a repeat of Visit 2: one single MRI scan 4 hours after consuming the mini-capsules.
-
- Visit #7 & #8 – The End
-
- Similar to Visits 3 and 4.
- Once #8 is done the study is finished and the child returns to the usual doctor and hospital appointments.
Project 3: Live Brief: Artists & style research
Styles:
http://www.slimjimstudios.com/


http://www.slimjimstudios.com/#/kokoso/


- Our main artist of inspiration
- Nice, clean cut, simplistic, positive colours, and good use of repeated animations
https://damiencolboc.tumblr.com/


- good pose referencing and character designs
- looked specifically at artists designs for limbs


- Great colours, simplicity compliments their designs, and their use of effects are amazingly stylised.
- Looked specifically at their use of curves, colours, composition, and character design


- This artists fan art of the game Undertale really brings out the simplicity in the child’s design and how nicely relatable the androgynous character is.
- Looked at: character design & composition.
http://tinmancreativestudios.tumblr.com/


- This studios style and use of humour and animation was very inspirational.
- Looked at: character designs, colours, and animation
Colour:
https://www.artstation.com/artist/shant


- good saturated colours
http://alexandrediboine.tumblr.com/


- nice curved simplistic designs and good colour schemes but they could be less grainy and more saturated.
http://kopso.tumblr.com/tagged/urt


- Great colours, exactly what we’re looking for. Positive and saturated colours to complement our character designs simplicity but they don’t always put their colours in a good scheme nor a amazing composition
https://www.youtube.com/user/Supardanil/featured


- Nice positive colours to compliment the simplistic designs and they work very nicely when using a gradient.
References:
SlimJim Studios. (2017). Work. [online] Available at: http://www.slimjimstudios.com/ [Accessed 31 May 2017].
SlimJim Studios. (2017). Work. [online] Available at: http://www.slimjimstudios.com/#/tokyo-gifathon/ [Accessed 31 May 2017].
SlimJim Studios. (2016). Work. [online] Available at: http://www.slimjimstudios.com/#/la-gifathon/ [Accessed 31 May 2017].
SlimJim Studios. (2015). Work. [online] Available at: http://www.slimjimstudios.com/#/kokoso/ [Accessed 31 May 2017].
Damien Colboc. (2015). [online] Available at: https://damiencolboc.tumblr.com/post/127017420884/sketches-and-stuff#notes [Accessed 31 May 2017].
Victoria Joh, artblog. (2016). [online] Available at: http://kvebox.tumblr.com/post/143603342690/yes-yes-i-can [Accessed 31 May 2017].
Victoria Joh, artblog. (2016). [online] Available at: http://kvebox.tumblr.com/post/154803972195/through-the-long-night [Accessed 31 May 2017].
Victoria Joh, artblog. (2016). Victoria Joh, artblog. [online] Available at: http://kvebox.tumblr.com/post/154757659825 [Accessed 31 May 2017].
nice art blog with nice art. (2016). [online] Available at: http://droplix.tumblr.com/post/147461091188/i-finally-played-undertale-it-was-nice-i-had-a [Accessed 31 May 2017].
Super Science Friends. (2016). [online] Available at: https://supersciencefriends.tumblr.com/post/158807025872/cartoonhangover-get-ready-to-fight-episode-3#notes [Accessed 31 May 2017].
Super Science Friends. (2016). [online] Available at: https://supersciencefriends.tumblr.com/post/138192163762/to-see-who-wins-support-us-on-kickstarter-so-we?is_related_post=1#notes [Accessed 31 May 2017].
Super Science Friends. (2016). [online] Available at: https://supersciencefriends.tumblr.com/post/138962697962/xulm#notes [Accessed 31 May 2017].
ArtStation. (2014). BOOM! , Anton Fadeev. [online] Available at: https://www.artstation.com/artwork/a552 [Accessed 31 May 2017].
ArtStation. (2016). Star Crystals, Anton Fadeev. [online] Available at: https://www.artstation.com/artwork/1BEaZ [Accessed 31 May 2017].
ArtStation. (2014). Greater Celandine, Anton Fadeev. [online] Available at: https://www.artstation.com/artwork/N8Pg [Accessed 31 May 2017].
Alexandrediboine.tumblr.com. (2017). Alexandre “Zedig ” diboine. [online] Available at: http://alexandrediboine.tumblr.com/post/156359438776 [Accessed 31 May 2017].
Alexandrediboine.tumblr.com. (2017). Alexandre “Zedig ” diboine. [online] Available at: http://alexandrediboine.tumblr.com/post/155645138376 [Accessed 31 May 2017].
Alexandrediboine.tumblr.com. (2017). Alexandre “Zedig ” diboine. [online] Available at: http://alexandrediboine.tumblr.com/post/155578582491 [Accessed 1 Jun. 2017].
He’s her lobster!. (2017). [online] Available at: http://kopso.tumblr.com/post/161066789171/hes-so-cute-and-he-loves-food-i-love-him [Accessed 1 Jun. 2017].
He’s her lobster!. (2016). [online] Available at: http://kopso.tumblr.com/post/144329984136/someone-please-tell-him-that-i-love-him [Accessed 1 Jun. 2017].
He’s her lobster!. (2016). [online] Available at: http://kopso.tumblr.com/post/134546567371/it-me [Accessed 1 Jun. 2017].
YouTube. (2017). Daniel Tan. [online] Available at: https://www.youtube.com/user/Supardanil/featured [Accessed 1 Jun. 2017].
Project 3: Live Brief: Feedback
Feedback:
We met with a bunch of people from the MAGIC Study with the purpose of getting their feedback on what they want to see in our animation, as they are specifically our target audience. We were surprised to get feedback saying we weren’t providing enough information or narration–primarily in the script which was my Anthony’s . His approach from the beginning is to tackle the script in a mature way, speaking directly to the audience as if to guide them through the process, without the use of characters, or acting like one. Feedback was good, going so far as to say the want even more information, bring up quotes and make elements like the ability to opt out more clear and defined.


Interacting with the kids and adults was very fun and they took our work very seriously but were nice and lighthearted when conversing. We made sure they understood the directions of our animation and what exactly will be explained and how it will be explained. We also shared with them all of our concept art, which they loved and were more than happy to make suggestions such as making the protagonist a little taller so that they seem more their age, adding in a nurse that is usually there and wearing red, etc.
Project 3: Live Brief: What software we’re using
After Effects
We’ve decided to all learn the primary animation software we will be using: Adobe After Effects CC 2015: the links to what helped exactly below. It was after we were essentially waiting on Nathan to complete all the artwork and all of the rigging that it became clear this would slow us down and is unfair.
So in the end we’ve decided to work like a more professional pipeline: when the artwork is complete and spliced, Nathan passes it onto me who then rig it while Kia handled the Background Artwork; in the end getting things done a lot quicker. (but due to a splice issue, Nathan ended up having to rig & re-rig all the characters anyway)
We used various tutorials to learn more about animation techniques in after effects such as:
For character creations:
For character movement:
And for general animation techniques and shortcuts
The artist that inspired most of our characters style also did a livestream on his process. It was nice to watch and listen to as we worked
References:
